검색결과 리스트
글
스프링 MVC 2편 - 백엔드 웹 개발 활용 기술 3
인프런 강의 42일차.
- 스프링 MVC 2편 - 백엔드 웹 개발 활용 기술 1 (김영한 강사님)
- 1편에서 배운 MVC를 활용할 수 있는 기술 습득
- 타입 컨버터, 파일 업로드, 활용, 쿠키, 세션, 필터, 인터셉터, 예외 처리, 타임리프, 메시지, 국제화, 검증 등등
1.10 속성 값 설정
- 타임리프 태그 속성(Attribute)
@GetMapping("/attribute")
public String attribute() {
    return "basic/attribute";
}
- hello.thymeleaf.basic.BasicController.java
- 타임리프 속성 처리 메소드
<!DOCTYPE html>
<html xmlns:th="http://www.thymeleaf.org">
<head>
    <meta charset="UTF-8">
    <title>Title</title>
</head>
<body>
<h1>속성 설정</h1>
<input type="text" name="mock" th:name="userA" />
<h1>속성 추가</h1>
- th:attrappend = <input type="text" class="text" th:attrappend="class='large'" /><br/> <!-- 렌더링 결과 : <input type="text" class="textlarge" /><br/>-->
- th:attrprepend = <input type="text" class="text" th:attrprepend="class='large'" /><br/> <!-- 렌더링 결과 : <input type="text" class="largetext" /><br/> -->
- th:classappend = <input type="text" class="text" th:classappend="large" /><br/> <!-- 렌더링 결과 : <input type="text" class="text large" /><br/> -->
<h1>checked 처리</h1>
- checked o <input type="checkbox" name="active" th:checked="true" /><br/> <!-- 렌더링 결과 : <input type="checkbox" name="active" checked="checked" /><br/> -->
- checked x <input type="checkbox" name="active" th:checked="false" /><br/> <!-- 렌더링 결과 : <input type="checkbox" name="active" /><br/> -->
- checked=false <input type="checkbox" name="active" checked="false" /><br/> <!-- 렌더링 결과 : <input type="checkbox" name="active" checked="false" /><br/> -->
</body>
</html>
- resources.templates.basic.attribute.html
- 타임리프 attribute 사용 html
* 속성 설정
- th:* 속성을 지정하면 타임리프는 기존 속성을 th:* 로 지정한 속성으로 대체한다. 기존 속성이 없다면 새로 만든다.
<!-- 타임리프 렌더링 전 HTML -->
<input type="text" name="mock" th:name="userA" />

<!-- 타임리프 렌더링 후 HTML -->
<input type="text" name="userA" />
* 속성 추가
- th:attrappend : 속성 값의 뒤에 값을 추가한다.
- th:attrprepend : 속성 값의 앞에 값을 추가한다.
- th:classappend : class 속성에 자연스럽게 추가한다.
* checked 처리
<input type="checkbox" name="active" checked="false" />- HTML에서 checked 속성은 checked 속성의 값과 상관없이 checked 라는 속성만 있어도 체크가 된다.
- 이런 부분이 true , false 값을 주로 사용하는 개발자 입장에서는 불편하다.
<!-- 타임리프 렌더링 전 HTML-->
<input type="checkbox" name="active" th:checked="false" />
<!-- 타임리프 렌더링 후 HTML-->
<input type="checkbox" name="active" />
- 타임리프의 th:checked 는 값이 false 인 경우 checked 속성 자체를 제거한다
1.11 반복
- 타임리프에서 반복은 th:each 를 사용한다. 추가로 반복에서 사용할 수 있는 여러 상태 값을 지원한다.
@GetMapping("/each")
public String each(Model model) {
    addUsers(model);
    return "basic/each";
}
private void addUsers(Model model) {
    List<User> list = new ArrayList<>();
    list.add(new User("userA", 10));
    list.add(new User("userB", 20));
    list.add(new User("userC", 30));
    model.addAttribute("users", list);
}
- hello.thymeleaf.basic.BasicController.java
- 타임리프 반복 처리 메소드
<!DOCTYPE html>
<html xmlns:th="http://www.thymeleaf.org">
<head>
    <meta charset="UTF-8">
    <title>Title</title>
</head>
<body>
<h1>기본 테이블</h1>
<table border="1">
    <tr>
        <th>username</th>
        <th>age</th>
    </tr>
    <tr th:each="user : ${users}">
        <td th:text="${user.username}">username</td>
        <td th:text="${user.age}">0</td>
    </tr>
</table>
<h1>반복 상태 유지</h1>
<table border="1">
    <tr>
        <th>count</th>
        <th>username</th>
        <th>age</th>
        <th>etc</th>
    </tr>
    <tr th:each="user, userStat : ${users}">
        <td th:text="${userStat.count}">username</td>
        <td th:text="${user.username}">username</td>
        <td th:text="${user.age}">0</td>
        <td>
            index = <span th:text="${userStat.index}"></span>
            count = <span th:text="${userStat.count}"></span>
            size = <span th:text="${userStat.size}"></span>
            even? = <span th:text="${userStat.even}"></span>
            odd? = <span th:text="${userStat.odd}"></span>
            first? = <span th:text="${userStat.first}"></span>
            last? = <span th:text="${userStat.last}"></span>
            current = <span th:text="${userStat.current}"></span>
        </td>
    </tr>
</table>
</body>
</html>
- resources.templates.basic.each.html
- 타임리프 each 사용 html
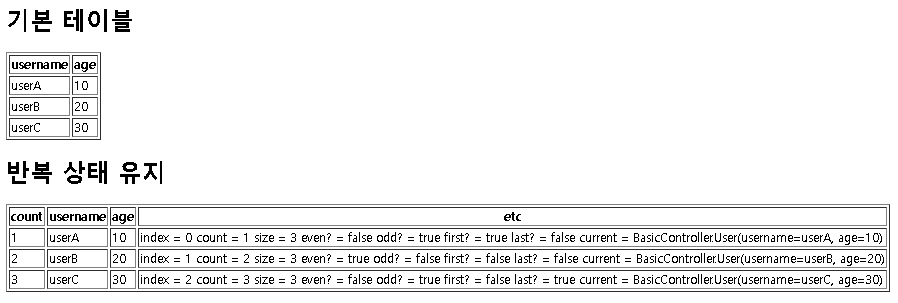
* 반복 기능
<tr th:each="user : ${users}">- 반복시 오른쪽 컬렉션( ${users} )의 값을 하나씩 꺼내서 왼쪽 변수( user )에 담아서 태그를 반복 실행합니다
- th:each 는 List 뿐만 아니라 배열, java.util.Iterable, java.util.Enumeration 을 구현한 모든 객체를 반복에 사용할 수 있습니다. Map 도 사용할 수 있는데 이 경우 변수에 담기는 값은 Map.Entry 입니다.
* 반복 상태 유지
<tr th:each="user, userStat : ${users}">- 반복의 두번째 파라미터를 설정해서 반복의 상태를 확인 할 수 있습니다.
- 두번째 파라미터는 생략 가능한데, 생략하면 지정한 변수명( user ) + Stat 가 됩니다.
- 여기서는 user + Stat = userStat 이므로 생략 가능합니다.
* 반복 상태 유지 기능
- index : 0부터 시작하는 값
- count : 1부터 시작하는 값
- size : 전체 사이즈
- even , odd : 홀수, 짝수 여부( boolean )
- first , last :처음, 마지막 여부( boolean )
- current : 현재 객체
1.12 조건부 평가
- 타임리프에서 반복은 th:each 를 사용한다. 추가로 반복에서 사용할 수 있는 여러 상태 값을 지원한다.
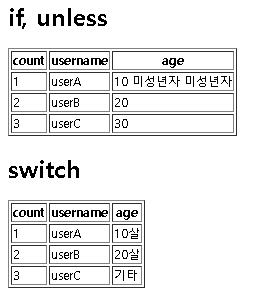
- 타임리프의 조건식 if , unless (unless는 if의 반대의미)
@GetMapping("/condition")
public String condition(Model model) {
    addUsers(model);
    return "basic/condition";
}
- hello.thymeleaf.basic.BasicController.java
- 타임리프 if 처리 메소드
<!DOCTYPE html>
<html xmlns:th="http://www.thymeleaf.org">
<head>
    <meta charset="UTF-8">
    <title>Title</title>
</head>
<body>
<h1>if, unless</h1>
<table border="1">
    <tr>
        <th>count</th>
        <th>username</th>
        <th>age</th>
    </tr>
    <tr th:each="user, userStat : ${users}">
        <td th:text="${userStat.count}">1</td>
        <td th:text="${user.username}">username</td>
        <td>
            <span th:text="${user.age}">0</span>
            <span th:text="'미성년자'" th:if="${user.age lt 20}"></span>
            <span th:text="'미성년자'" th:unless="${user.age ge 20}"></span>
        </td>
    </tr>
</table>
<h1>switch</h1>
<table border="1">
    <tr>
        <th>count</th>
        <th>username</th>
        <th>age</th>
    </tr>
    <tr th:each="user, userStat : ${users}">
        <td th:text="${userStat.count}">1</td>
        <td th:text="${user.username}">username</td>
        <td th:switch="${user.age}">
            <span th:case="10">10살</span>
            <span th:case="20">20살</span>
            <span th:case="*">기타</span> <!-- 스위치를 의미하는 *는 만족하는 조건이 없을 때 사용하는 디폴트이다. -->
        </td>
    </tr>
</table>
</body>
</html>
- resources.templates.basic.condition.html
- 타임리프 if, unless사용 html
* if, unless
- 타임리프는 조건이 맞지 않으면 태그 자체를 렌더링하지 않는다.
<!-- 조건이 false 인 경우 <span>...</span> 부분 자체가 렌더링 되지 않고 사라진다. -->
<span th:text="'미성년자'" th:if="${user.age lt 20}"></span>
1.13 주석
@GetMapping("/comments")
public String comments(Model model) {
    model.addAttribute("data", "Spring!!!");
    return "basic/comments";
}
- hello.thymeleaf.basic.BasicController.java
- 타임리프 주석 처리 메소드
<!DOCTYPE html>
<html xmlns:th="http://www.thymeleaf.org">
<head>
    <meta charset="UTF-8">
    <title>Title</title>
</head>
<body>
<h1>예시</h1>
<span th:text="${data}">html data</span>
<h1>1. 표준 HTML 주석</h1>
<!-- 자바스크립트의 표준 HTML 주석은 타임리프가 렌더링 하지 않고, 그대로 남겨둔다. -->
<!--
<span th:text="${data}">html data</span>
-->

<h1>2. 타임리프 파서 주석</h1>
<!-- 타임리프 파서 주석은 타임리프의 진짜 주석이다. 렌더링에서 주석 부분(/* */)을 제거한다. -->

<!-- 타임리프 파서 주석을 1줄로 표현한 형태 -->
<!--/* [[${data}]] */-->

<!-- 타임리프 파서 주석을 여러줄로 표현한 형태 -->
<!--/*-->
<span th:text="${data}">html data</span>
<!--*/-->

<h1>3. 타임리프 프로토타입 주석</h1>
<!--
 타임리프 프로토타입은 약간 특이한데, HTML 주석에 약간의 구문을 더했다.
 HTML 파일을 웹 브라우저에서 그대로 열어보면 HTML 주석이기 때문에 이 부분이 웹 브라우저가 렌더링하지 않는다.
 타임리프 렌더링을 거치면 이 부분이 정상 렌더링 된다.
 쉽게 이야기해서 HTML 파일을 그대로 열어보면 주석처리가 되지만, 타임리프를 렌더링 한 경우에만 보이는 기능이다
-->

<!--/*/
<span th:text="${data}">html data</span>
/*/-->

</body>
</html>
- resources.templates.basic.comments.html
- 타임리프 주석 사용 html
<!DOCTYPE html>
<html>
<head>
    <meta charset="UTF-8">
    <title>Title</title>
</head>
<body>
<h1>예시</h1>
<span>Spring!!!</span>
<h1>1. 표준 HTML 주석</h1>
<!--
<span th:text="${data}">html data</span>
-->

<h1>2. 타임리프 파서 주석</h1>


<h1>3. 타임리프 프로토타입 주석</h1>

<span>Spring!!!</span>


</body>
</html>
- comments.html 실행 결과 HTML
'Spring 정리' 카테고리의 다른 글
| 스프링 MVC 2편 - 백엔드 웹 개발 활용 기술 5 (0) | 2022.06.08 |
|---|---|
| 스프링 MVC 2편 - 백엔드 웹 개발 활용 기술 4 (0) | 2022.06.03 |
| 스프링 MVC 2편 - 백엔드 웹 개발 활용 기술 2 (0) | 2022.05.31 |
| 스프링 MVC 2편 - 백엔드 웹 개발 활용 기술 1 (0) | 2022.05.30 |
| 스프링 MVC 1편 - 백엔드 웹 개발 핵심 기술 28 (1) | 2022.05.29 |
